The black railing is anodized, not powder-coated, the hardware, however, is powder-coated black to match. All finishes can scratch and, if a scratch is deep enough to expose the underlying metal, it will be visible. That said, both the anodizing and the powder-coating are extremely durable and will not scratch under normal use. Because the anodizing is integral with the aluminum, small surface scratches and scuff mark can usually be removed with an abrasive cleanser like Vim or Comet without any effect on the finish.
Author: Support
What screws should I use for steel studs?
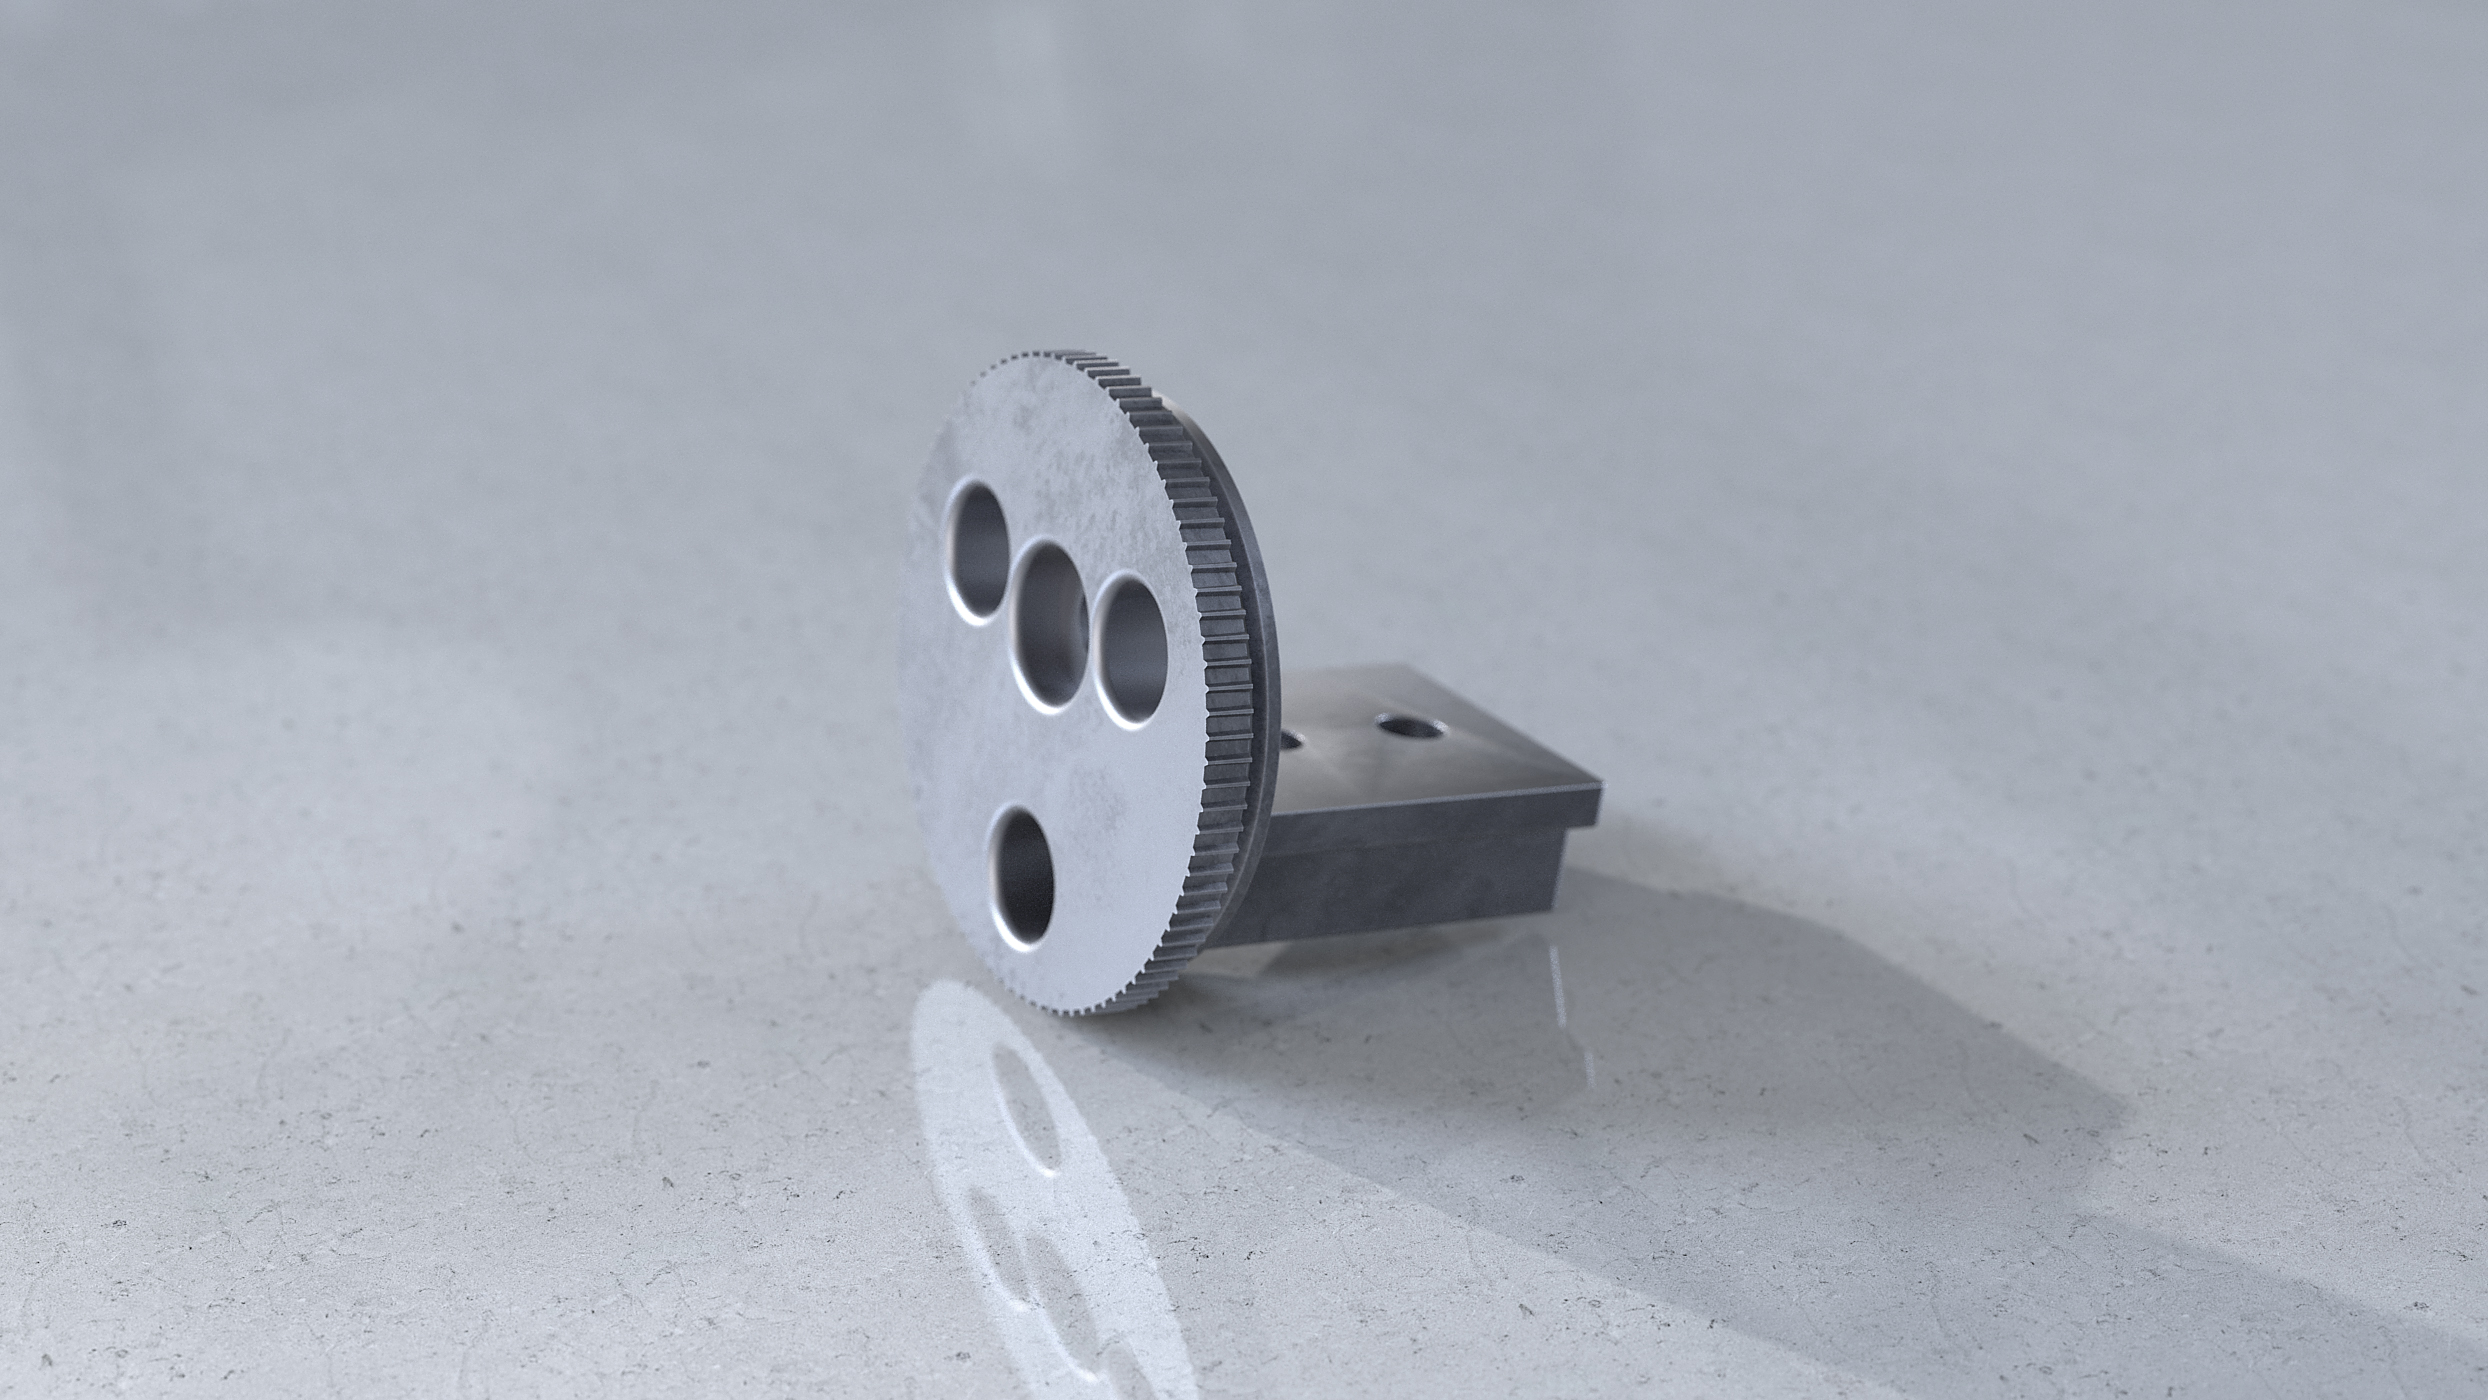
Pivoting brackets
You can attach Promenaid pivoting brackets to commercial-grade (heavy gauge) steel studs using the supplied screws. Attaching pivoting brackets to residential-grade steel studs is not recommended.
Sprocketlock brackets and bends
Use a 1/4″ toggle bolt to attach Sprocketlock brackets or bends to any type of steel stud. The bolt will be hidden by the final installation.
What screws should I use for brick or concrete?
Pivoting brackets
You can use 1/4″ flat head ‘Tapcon’ masonry screws (or equivalent) to attach Promenaid pivoting brackets to brick or concrete. They must be of sufficient length and they must be installed according to the manufacturer’s recommendations.
For a more finished appearance, use the supplied dome-head screws with suitable anchors. We suggest lead anchors (also known as leadwood anchors) rated for #12 screws and at least 1-1/2″ long. Drill the hole for the anchor 2-1/2″ deep so that the screw may penetrate fully.
Sprocketlock brackets and bends
Use 1/4″ hex head ‘Tapcon’ masonry screws (or equivalent) to attach Promenaid Sprocketlock brackets or bends to brick or concrete. Alternatively, use 1/4″ wedge anchors or steel screws with lead anchors. Whichever fastener you use, it will be hidden in the final installation.
Please consult the How-to videos or download the Promenaid instructions for more information.
Can I attach brackets to drywall?
In general, Promenaid brackets must be attached to studs, masonry, or equivalent wall structure. Attaching to drywall alone is not sufficient. There are a few possible exceptions:
- Attaching to drywall may be acceptable if a bracket is purely decorative, i.e. installed for symmetry where sufficient brackets attached to wall structure exist. In these cases, #12 Triple-Grip wall anchors are recommended for Promenaid pivoting brackets
- If the drywall is reinforced, for example doubled or tripled, and/or the number of brackets is increased to provide equivalent overall strength to an installation on studs. In these cases, Snaptoggle-type toggle bolts are recommended for Promenaid pivoting brackets
Sprocketlock brackets, or Promenaid Pivoting brackets with Wall Adapters, will allow for additional mounting options because the fasteners are hidden in the final installation. Heavy-duty drywall fasteners that may provide additional strength include larger Snaptoggle bolts, and Moen Securemount anchors
Please consult the How-to videos or download the Promenaid instructions for more information.
What are the U-shaped aluminum pieces for?
The small horseshoe-shaped aluminum pieces are shims. You can use them if necessary under the post flange, to make the post vertical on an uneven mounting surface.
What supplies will I need to install Promenaid railing?
Standard installations
A Promenaid Handrail Kit comes complete with all the materials you need for a standard installation: railing with anti-slip insert, endcaps with set screws, the recommended number of brackets, and bracket screws for wood studs.
To install the kit you will need a tape measure, a stud finder (if the locations of the studs are not known), a Phillips screwdriver, an electric drill, a 5/32″ bit to drill pilot holes in the studs, and a #3 Phillips bit (for Pivoting Bracket screws) or 7/16″ hex bit (for Sprocketlock Bracket screws).
Custom installations
Complex installations that include bends, switchbacks, loops, joggles, posts, balusters, LEDs, glass mounting, or other non-standard details may require additional components, fasteners, or tools.
Please consult the How-to videos or download the Promenaid instructions for more information.
What types of posts are available?
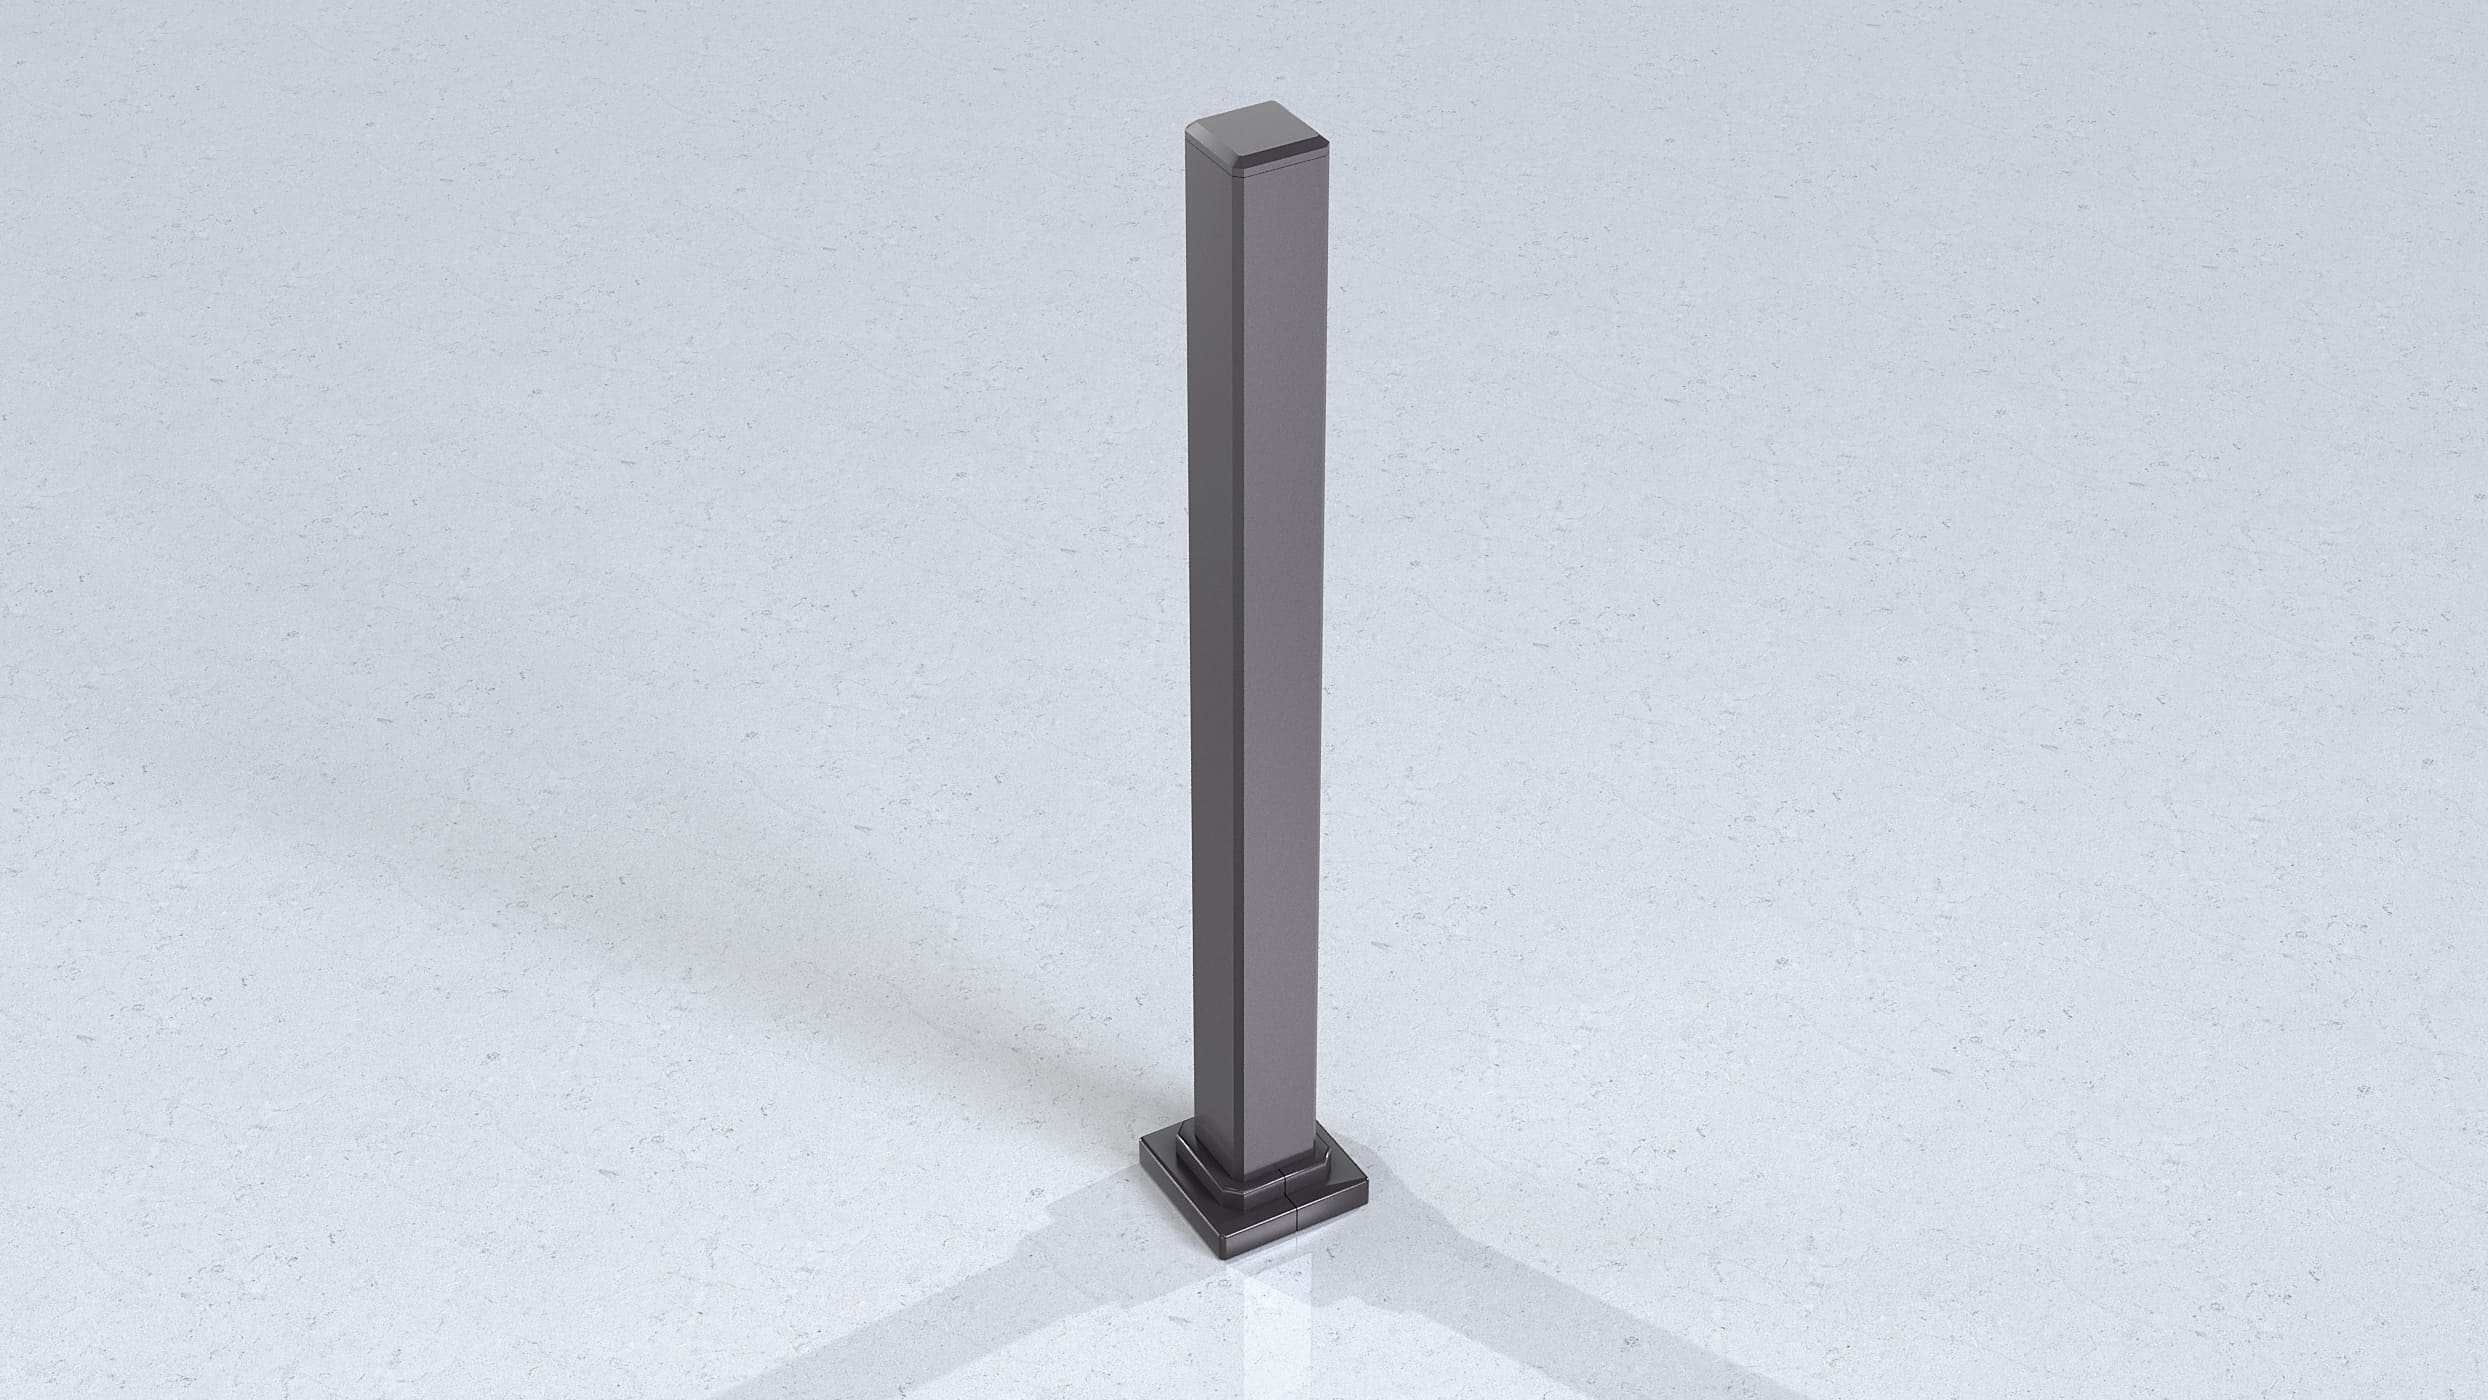
Promenaid offers two different post styles:
Square post
Promenaid square mounting posts are 3″ x 3″ x 37″ high, with a 5-1/4″ mounting flange that is hidden by a supplied flange cover. Posts can be mounted on wood, steel, aluminum, or concrete using 3/8″ bolts or wedge anchors. The charcoal grey color complements all of our handrail and hardware finishes. Square posts are also available in custom lengths.
Round post
Promenaid round post is similar to Schedule 40 1.25″ pipe, has the same diameter as our Channelgrip handrail, and is available in the same Satin Black, Architectural Bronze, and Silver colors. It is available in any length and can be cast or glued in concrete, or mounted on a variety of surfaces with the Sprocketlock Adjustable Post Base.
Please consult the How-to videos or download the Promenaid instructions for more information.
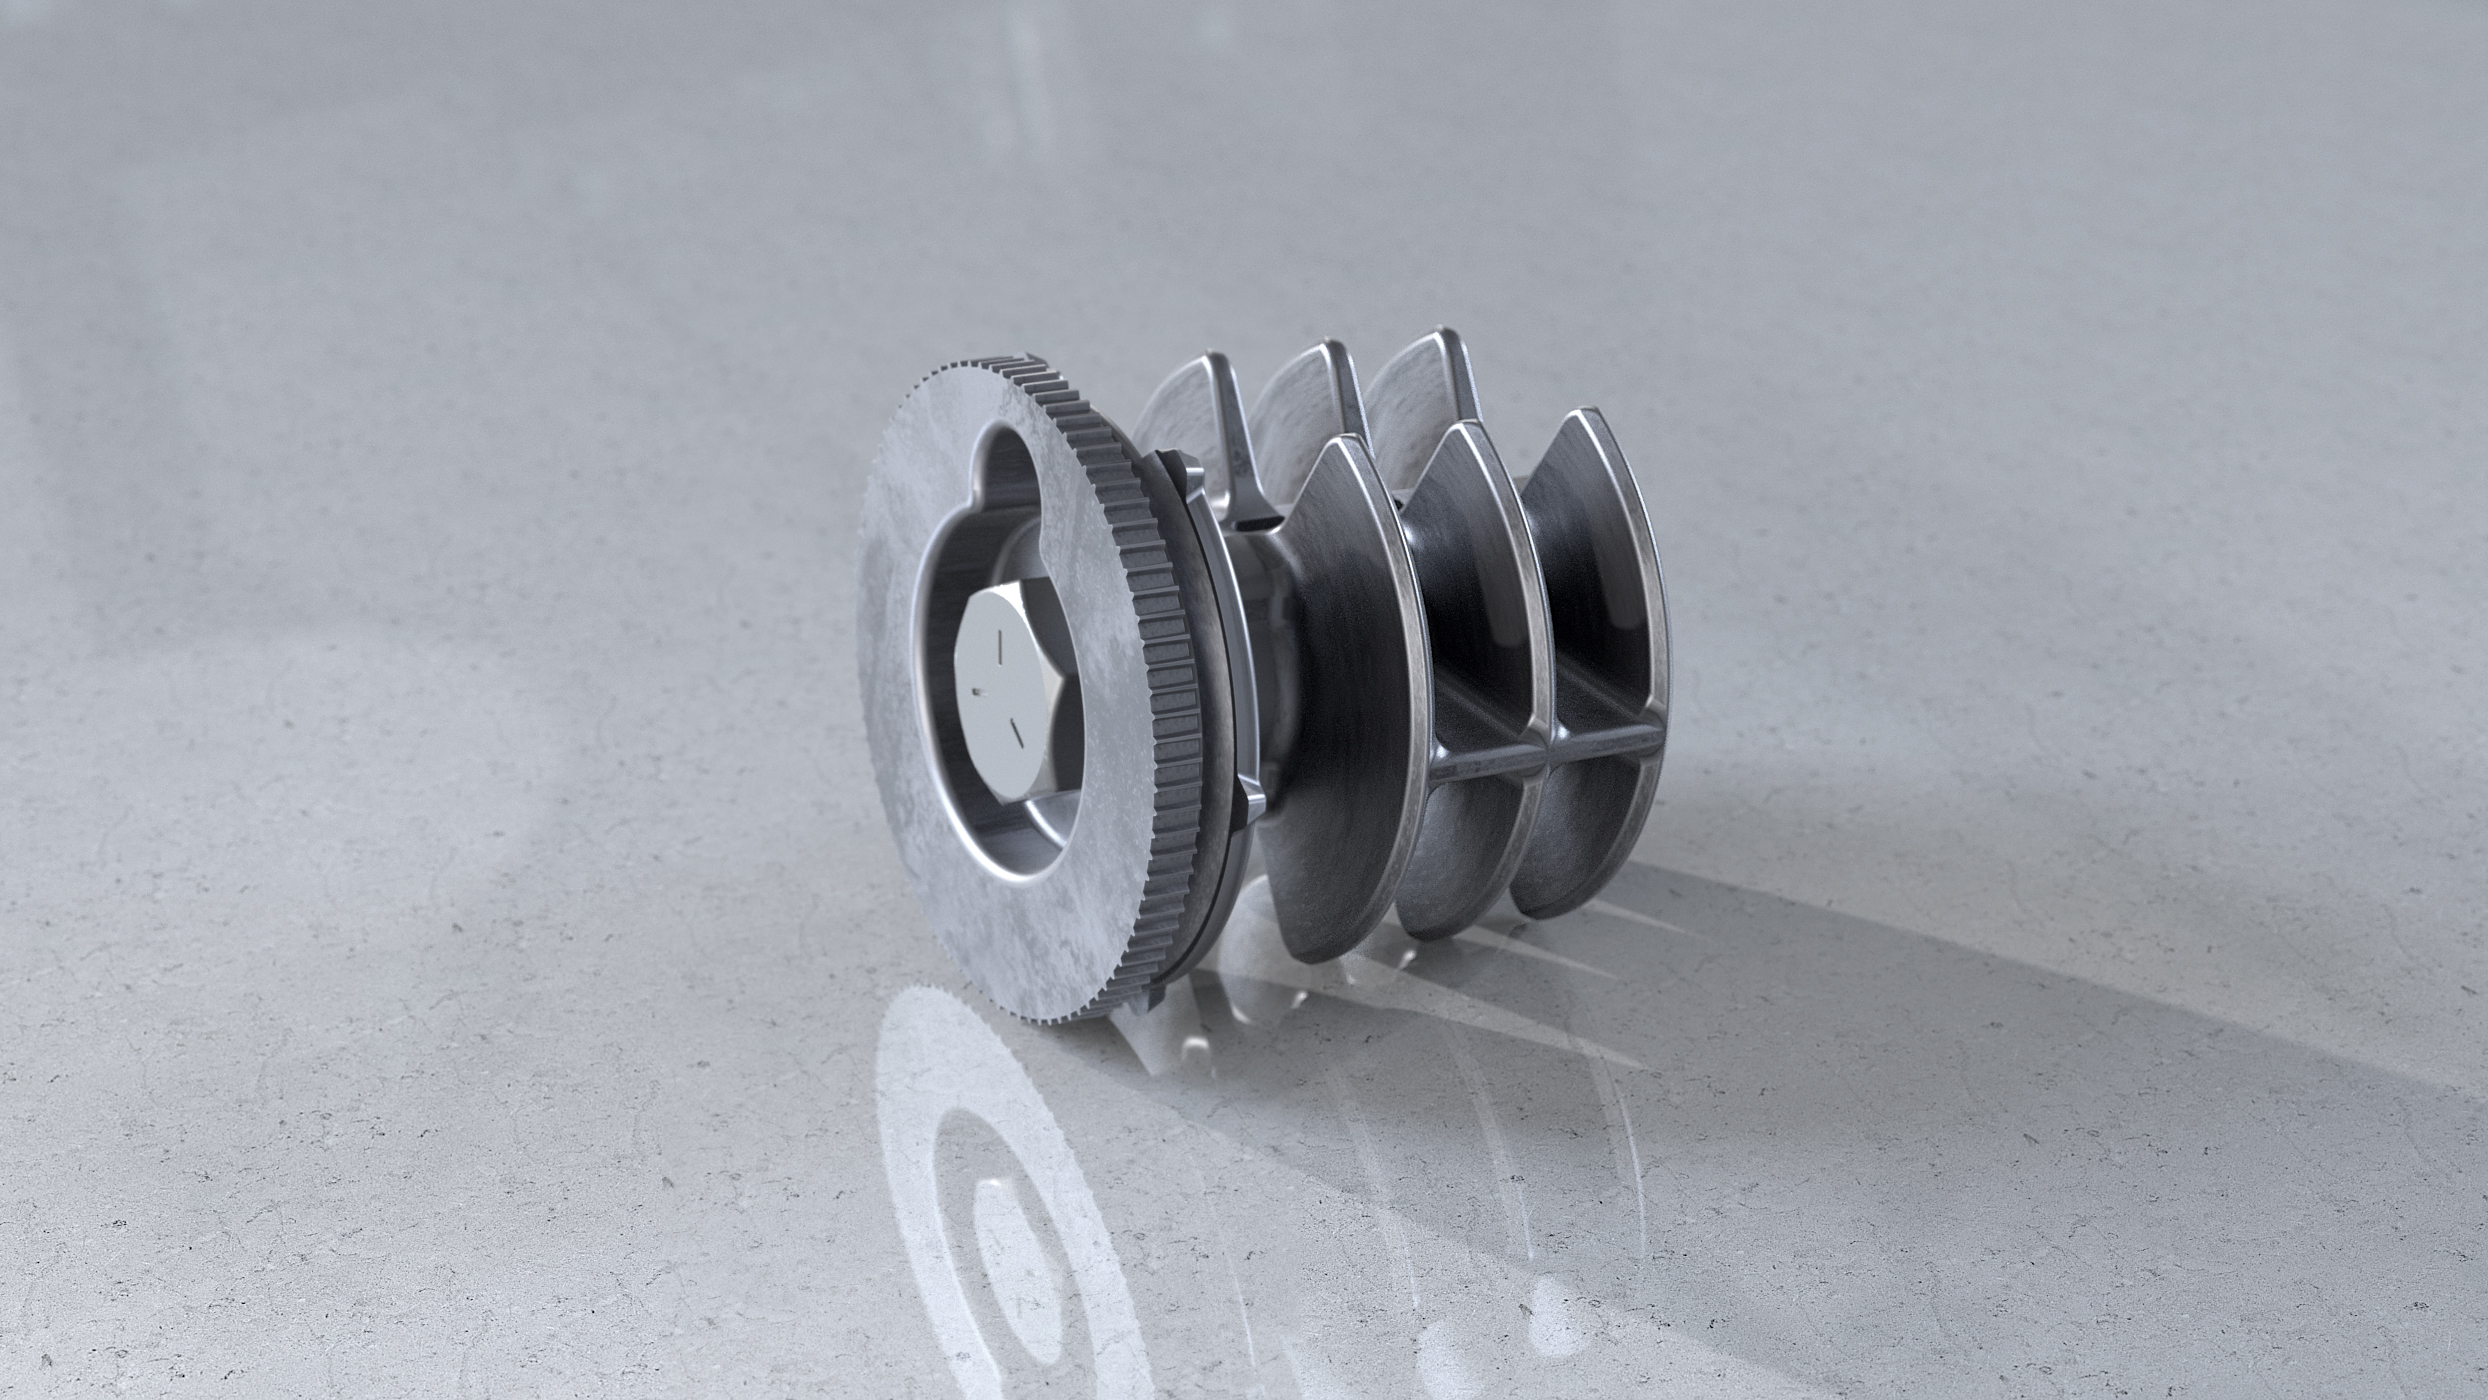
How do I install Pivoting Brackets
- Make sure that the bracket is perpendicular to the handrail and is fully inserted into the handrail channel
- Twist the bracket clockwise. You should feel no resistance at first
- When the bracket approaches 90 degrees rotation, you will feel a gradually increasing resistance
- The bracket should lock in place when it reaches 90 degrees. Do not over-rotate
- Reposition the bracket if necessary by un-twisting, sliding, and re-twisting it
- When the bracket is locked in the correct place, you can pivot it to the desired angle by twisting it firmly. If the stainless steel head on you bracket is attached with a screw, there should be no need to adjust it unless it becomes loose after repeated installations
- Occasionally, due to tolerances in the handrail extrusion, over-rotation, or repeated installation, the pivoting stainless steel head may not lock securely in the handrail channel. To correct this, use a flat-blade screwdriver to bend the curved tongue on the stainless steel head outward, approximately 1/16″
- When you have determined the correct bracket location, drill pilot holes in the wooden stud for all three screws (see FAQs for attaching to other surfaces). Use a 5/32″ drill bit, or larger for hard wood, and angle the top two screws inward to prevent splitting of the stud. Pilot holes should be at least 2-1/2″ deep
- Use an electric screwdriver with a #3 (large) Phillips Head bit and a bit extension if necessary to avoid contact between the drill chuck and the bracket. Tighten the screws securely, but do not set the driver to maximum torque as this may damage the screws. If there is too much resistance, drill a larger pilot hole
Please consult the How-to videos or download the Promenaid instructions for more information.
How do I cut Promenaid railing to length?
Promenaid aluminum handrail is available pre-cut to the inch but, if you need to cut it on site, you can use a standard miter saw just like the one you would use to trim wooden moldings.
Almost any blade, even the wood blade that comes with the saw, will make a smooth cut if the blade has carbide teeth.
Do not use an abrasive cutter (chop saw) meant for cutting steel.
How do I install Channelux LED modules?
Channelux LED modules can be installed anywhere along the length of the handrail. They fit flush inside the channel, connect together in a ‘daisy chain’ and can be powered by low voltage wires via any wall connection or Sprocketlock bracket. The modules are suitable for indoor or outdoor use.
How many modules should I use?
Three modules have approximately the same light output as one 60W bulb. The brightest area below the module is about 4 feet wide. If you place modules every 3 feet (the same as brackets) you will get strong and even light. You can also use fewer modules for accent or spot lighting.
How are the modules powered?
Any 24VDC constant voltage driver (transformer) will work. Each module consumes 2W, so the driver must be sized appropriately. Up to 48 modules can be powered by one 100W driver. Small plug-in 24VDC power supplies are an inexpensive way to power smaller numbers of modules. Search online for ’24VDC power supply for LED strip lighting’ and you will find hundreds of options.
How are the modules controlled?
The simplest way to control Channelux LED modules is to power the driver on and off with a standard wall switch.
Dimmable LED drivers that can be controlled by a dimmer switch may also be used, but you must take care to insure that the driver is sized according to the total wattage of your installation (a driver that is oversized will not dim properly) and that the driver and dimmer switch are compatible.
You can also install a dimmer that is rated for strip lighting between a standard (non-dimmable) driver and the Channelux modules. These devices have their own remote controls and many are compatible with Google Home, Alexa, or Apple Home Kit. Search online for ‘dimmer for LED strip lighting’.